")
Sometimes a photo looks perfect except for one small issue, that is, the angle of the photo is wrong. Maybe the picture was taken sideways, upside down, or slightly tilted. Thankfully, the iPhone makes it very easy to rotate photos without installing any third-party photo editing apps.
In this guide, you’ll learn how to rotate a photo on iPhone step by step. We’ll also cover how to straighten tilted images, rotate multiple photos, and fix common issues if the rotate option is not working.
How to Rotate a Photo on iPhone
If you only want to rotate a picture quickly, you can do it directly from the Photos app.
Steps to Rotate a Photo on iPhone
- Open the Photos app on your iPhone.
- Select the photo you want to rotate.
- Tap the Edit icon.
- Tap the Crop icon at the bottom of the screen.
- Now tap the Rotate button in the upper-left area.
- Each tap rotates the image by 90 degrees.
- Once the photo looks correct, tap Done.
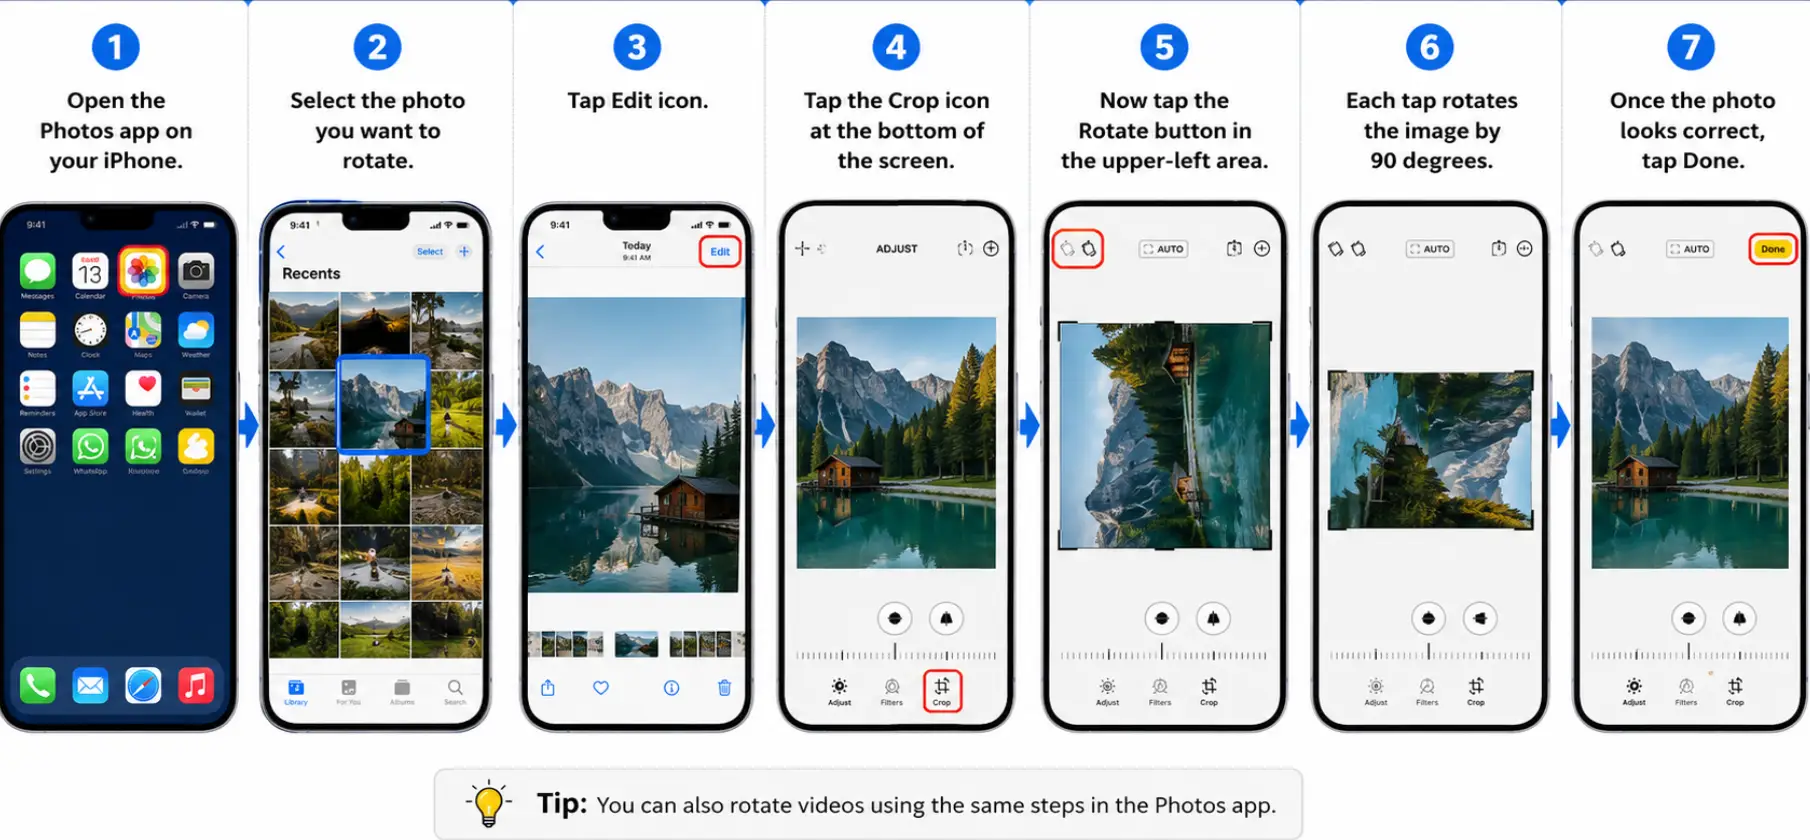
That’s it. Your rotated image will automatically save in the Photos app.
How to Straighten a Tilted Photo on iPhone
Sometimes the image is not fully sideways but slightly crooked. In that case, rotating by 90 degrees may not help.
Instead, you can straighten the image manually.
Here’s How –
- Open the photo in the Photos app.
- Tap Edit.
- Select the Crop tool.
- Use the adjustment slider below the image.
- Move it left or right until the photo looks level.
- Tap Done to save changes.
This works especially well for:
- Horizon photos
- Building shots
- Landscape pictures
- Group photos taken at an angle
How to Rotate a Photo While Taking It
Many users accidentally capture sideways photos because the phone orientation changes while clicking the picture.
To avoid this:
- Hold the iPhone upright before taking photos
- Make sure screen rotation is not locked
- Check the preview before capturing the image
Using the camera grid feature can also help keep photos straight.
Read Also – How to Share Location on iPhone
How to Rotate Multiple Photos on iPhone
The built-in Photos app does not currently allow batch rotation for multiple images at once.
However, you can still:
- Rotate photos one by one manually
- Use the Files app with third-party editing tools
- Use the Mac Photos app if your images are synced with iCloud
If you frequently edit multiple images together, apps like Snapseed or Adobe Lightroom can make the process faster.
Why the Rotate Option May Not Work on iPhone
Sometimes the rotate tool may appear greyed out or fail to save changes.
Here are the most common reasons:
➤ Low Storage Space
If your iPhone storage is almost full, edits may not save properly.
Fix:
- Delete unused apps or files
- Free up storage space
- Restart the Photos app
➤ iCloud Sync Delay
If iCloud Photos is syncing in the background, edits can occasionally lag.
Fix:
- Connect to stable Wi-Fi
- Wait for syncing to complete
- Reopen the image
➤ Temporary iOS Glitch
Minor software bugs can sometimes affect editing tools.
Fix:
- Restart your iPhone
- Update iOS to the latest version
- Reopen the Photos app
Can You Undo a Rotated Photo on iPhone?
Yes. iPhone keeps the original version of your image even after editing.
If you want to undo the rotation:
- Open the edited image
- Tap Edit
- Select Revert
- Tap Revert to Original
This restores the original version instantly.
Tips for Better Photo Alignment on iPhone
Here are a few simple tips that help reduce photo rotation problems:
- Turn on camera grid lines
- Hold the phone steadily while taking pictures
- Use landscape mode properly
- Avoid sudden wrist movement
- Check photo orientation before saving
These small habits make a noticeable difference, especially when taking travel or outdoor photos.
Final Thoughts
Learning how to rotate a photo on iPhone only takes a few seconds, but it can instantly improve how your pictures look. Whether your image is sideways, upside down, or slightly tilted, the built-in Photos app gives you simple editing tools to fix it quickly.
For most users, the default iPhone editor is more than enough for basic photo adjustments. And if you ever make a mistake, you can always revert the image back to its original version.
So the next time a photo looks off-angle, you can fix it directly from your iPhone without using any extra apps.
Read Also – How to Delete Stickers on iPhone